QA Portal Help
Portal Overview
The QA Portal comes loaded with default testing protocols that organize which tests should be performed and how often they should be performed. In the nomenclature of the QA Portal, the tests are called “Procedures” which are grouped into “Lineups” that define when each test should be performed. The Portal also has reporting features that allow you to document your test results and export them for more detailed analysis.
The QA Portal currently has pre-loaded testing protocols for the following four phantoms:
- Model 40GSE Multi-Purpose, Multi-Tissue Ultrasound Phantom
- Model 54GS General Purpose Ultrasound Phantom
- Model ATS 539 Multi-Purpose Phantom
- Model ATS 570 Multi-Purpose and Endoscopic Phantom
These programs are designed to meet or exceed the QA testing requirements of three main organizations responsible for setting Ultrasound Quality Assurance testing standards in the United States: the ACR1, the AIUM2,3 and the AAPM4. The default protocols all contain phantom-specific test procedures, grouped into three different test lineups. These lineups are named using terminology borrowed from the ACR Ultrasound Accreditation Program.
- Acceptance Testing: conducted when a machine or transducer has been purchased or returned to service after a repair. Acceptance tests may also be repeated when a problem is found with a system in order to obtain additional data on the severity of the problem.
- Routine Quality Control Testing: basic QA tests conducted on a semi-annual basis (quarterly)
- Annual Test: more complete QA tests conducted annually
Which test procedures are included in each lineup was determined after a careful review of the requirements of the ACR, AAPM and AIUM. It should be noted, though, that the default QA Protocol exceeds many of these requirements, and choses to implement them in a way that is not appropriate for your institution. For that reason, all users should review the summary table below and edit the default Procedures and Lineups to match their internal requirements. Note that one test lineup must be designated as the “Baseline” test lineup and sets reference values for determining pass/fail conditions in many tests. The Acceptance Testing lineup is set as the baseline lineup in the default protocols. Users that do not wish to perform acceptance testing (it is optional according to the ACR Ultrasound Accreditation program) will need to set another lineup as the baseline test. See Editing the Default Test Protocols within the Instructions for Use for more information on how to edit protocols.
| Test | QA Portal Protocols | ACR | AAPM | AIUM | IEC TS 62736 | Notes |
|---|---|---|---|---|---|---|
| Physical & Mechanical Inspection | Routine QC | Annual | Quarterly | Daily+ | Monthly | AIUM requires daily cleanliness and safety checks. 40GSE has semi-annual audit of these protocols, while ACR recommends optional semi-annual inspections |
| Ultrasound Scanner Display Performance | Routine QC | Annual | Quarterly | Daily | Monthly | AIUM recommends daily check of controls and the greybar display by the sonographer, while ACR recommends optional inspections during Routine QC. |
| Primary Interpretation Display Performance | Routine QC | –– | Quarterly | –– | –– | ACR recommends optional annual or semi-annual testing. This has been deleted from CIRS protocols, as testing of PACS displays is typically performed by the IT department |
| Image Uniformity and Artifact Survey | Routine QC | Annual | Quarterly | Annual | Monthly (in-air) Bi-annual (phantom) |
ACR also recommends optional semi-annual testing of image uniformity |
| Geometric Accuracy (Mechanically Scanned Transducers) | Routine QC | –– | Quarterly | Annual | Biannual | ACR recommends optional semi-annual distance measurement accuracy tests for 3D transducers with a mechanical sweep (in the sweep direction) |
| Geometric Accuracy | Annual | –– | Quarterly | Annual | Biennial | ACR recommends optional annual distance measurement accuracy tests for standard transducers |
| System Sensitivity (Depth of Penetration) | Annual | Annual | Quarterly | Annual | Biennial | |
| Contrast Resolution | Annual | –– | Annual | Annual | Biennial | ACR recommends optional annual contrast resolution tests. A thorough contrast resolution test is a useful adjunct to the image uniformity artifact surface and also provides useful information about spatial resolution. |
| Spatial Resolution (Axial / Lateral) | Acceptance | –– | Annual | –– | Biennial | ACR recommends optional annual spatial resolution test |
| Spatial Resolution (Elevational) | Acceptance | –– | Annual | –– | Biennial | ACR recommends optional annual spatial resolution test |
| Greyscale Contrast | Acceptance | –– | –– | –– | –– | |
| Dead Zone | Acceptance | –– | Annual | –– | –– | |
| Elastography | Acceptance | –– | –– | –– | –– |
Instructions for Use
Step 1: Create Inventory of Equipment to be Tested Back to Top
To get started with the QA portal, you must first create an inventory of the ultrasound scanners and transducers to be tested.5
Note that machines and transducers are tracked separately in the QA Portal, as transducers often move from one scanner to another.
To create your inventory, go to the Equipment tab on the Portal menu
- Click the icon to add ultrasound machines to your inventory and follow the system prompt to enter the relevant data for each machine
- Click the icon to add ultrasound transducers to your inventory and follow the system prompt to enter the relevant data for each transducer
Step 2: Editing the Default Test Protocols Back to Top
Many users may wish to edit the default protocols as most appropriate for their institution. To do so, select Tests on the Portal menu.
The Tests page has two separate tabs, defined below:
Lineups – collections of tests conducted at a set frequency
Procedures – tests instructions along with a definition of the data collected as part of the test
Editing Test Lineups
To modify the pre-loaded recommendations in the 40GSE QA Test Protocol, edit or delete the each of the Test Lineups associated with the Protocol.
To edit a Lineup, select the icon to the left of the Lineup name. A new screen will open with an Edit menu to the left and a list of Tests to the right.
The following setup information may be changed in the Edit menu:
- Lineup Name: Edit as appropriate
- Protocol Type: Cannot be changed when editing a lineup. To create a new protocol, see Creating a New Protocol
- Frequency: Choose frequency with which the test protocol will be performed
- Baseline Program checkbox: Check if the test results from this set of tests will be used as a baseline for setting pass/fail criteria during future tests. Baseline tests are normally performed once, during acceptance testing. Thus, the frequency of testing should be set to “As Needed” when this box is checked.
With the Tests list to the right, users may assign or unassign tests procedures to be performed as part of the Protocol. They may also change the order with which the procedures are performed using the arrow icons to the right of the Procedure.
Deleting Test Lineups
Test Lineups may be deleted by selecting the icon to the right of the Lineup. Users may choose to do this if, for instance, they will only conduct QA testing annually. In this case, the semi-annual tests could be deleted.
Creating New Protocols and Lineups
New Lineups and Protocols can be created from the Lineups tab. To do so, use the icon to create a new lineup. The procedure for creating a new lineup is similar to that of editing a lineup, except that field for Protocol Type may be edited when creating a new lineup.
To Create a new Protocol, choose Other from the list of Protocol Types. A prompt will open asking you to name this protocol. Additional Lineups can be associated to this protocol by creating new Lineups from the Lineups tab. The new protocol will be listed in the Protocol Type field.
Creating and Editing Test Procedures
Procedures may be created, edited or deleted using the , and icons from the Procedures tab. Basic information about the Procedure is edited in the menu to the left.
Basic information about the Procedure is edited in the menu to the left, which has the following fields:
- Name: Enter name of procedure here
- Applicable Equipment: Each procedure must be associated with either a transducer or a machine, depending on the type of equipment the procedure applies to.
- Upload Instructions Document: Detailed instructions for each pre-loaded procedure have been provided by CIRS. However, users may wish to upload their own instructions if they choose to employ alternate methodology.
- Instructions Video Link: For those who would rather refer to an instructional video, users my post a video to YouTube or a similar site and post the link here.
- Summary: provides shorter, more easily accessible instructions as the Instructions Document must be downloaded which may not be convenient when logging test results.
The section to the right has two tabs for associating Test Values and Lineups to a procedure.
Test Values create the data entry fields associated with each test. New fields are created using the icon, while existing fields are edited using the icon. Note that multiple Test Values can be associated with a single procedure, as appropriate.
Five data types are supported in the Test Values tab:
- Decimal should be chosen for tests associated with a quantitative measurement, such as Depth of Penetration. When choosing this test, users can optionally add a Unit of Measurement, a Warning Tolerance and a Failure Tolerance to the measurement. The tolerance values may be left blank if the data is to be collected for informational purposes only.
- List should be chosen for tests where the outcome is based on a scale, such as Image Uniformity. Option Value provides a numeric value for each member or the list, Option Description provides a written description, while Option Status allows you to associate a pass/fail condition to the value. Option Status may be left blank if the data is to be collected for informational purposes only.
- Pass/Fail is used for simple system checks, such as when checking for transducer cable condition.
- Setting is used for recording system settings used in the conduct of a test. Settings data can only be changed during baseline testing. Afterwards, the values become “read-only” and provided as a reminder to maintain consistent system settings each time a test is performed.
- Machine Selection is used when testing transducers and need only be included in the “System Settings” test procedure. This data type was created to help users troubleshoot a failure that occurs on a transducer that is tested on a different machine from a previous test.
The Lineups tab is used to associate the Procedure with one or more Lineups. Any procedure associated with a periodic testing lineup (as opposed those only performed during Acceptance Testing) should be associated with two lineups: the baseline lineup (usually Acceptance Testing) and another lineup performed as part of routine QA testing.
Step 3: Enter Test Results Back to Top
Reminder: QA measurements should always be performed at the same system settings to ensure consistency of results. Protocols in the QA Portal includes a test procedure for recording system settings as part of each test lineup; these settings are auto-populated from the baseline test values. Creating a special QA preset is highly recommended so that you can more easily retrieve settings when conducting QA tests. Guidelines for choosing system settings are provided in the instructions document associated with the system settings test procedure.
Instructions:
- Select Start Testing » to start entering date for each machine / transducer
- The system will prompt you to choose a testing protocol. Chose a protocol that matches the phantom you own (see see section 4).
- Begin entering test results for the first lineup due, which should be your designated baseline test (the default baseline is the Acceptance Testing lineup). You may either directly enter test results on your computer or print out a paper form.
- Direct entry: You will be automatically directed to the screen for direct entry of results to the computer
- Paper entry: While in the direct entry create, select the PDF icon on the top right to create a PDF version of this screen. The form can also be downloaded from the Equipment Menu when you select one of the “Active Tests” buttons.
- The info column provides instructions for performing each test:
- Scrolling over the icon provides a short summary of the test procedure.
- Selecting the provides detailed written instructions
- Selecting the icon provides video instructions
- Users can update instructions to better match their internal testing protocols. See Changing the Default Test Protocols for more information on how to add instructions specific to your testing environment.
Step 4: Creating Test Reports Back to Top
Once you have completed testing, the Reports page provides convenient summary data for your testing program, and can be accessed by clicking on the Reports tab on the QA Portal Menu. The available reports include:
- Download CSV: Allows users to download test results for one or more pieces of equipment in a format that can be analyzed in a spreadsheet or other software. This may be particularly helpful when, for example, the Depth of Penetration measurement exceeds the warning tolerance. In this case, a trending analysis over time may provide additional insight into how significant the problem is.
- Equipment Summary Report: Provides a convenient listing of all the ultrasound machines/transducers in your equipment inventory, and the status of all tests performed to date This listing is designed to assist in your QA audit, whether as part of a required accreditation process or to fulfill your own internal requirements.
-
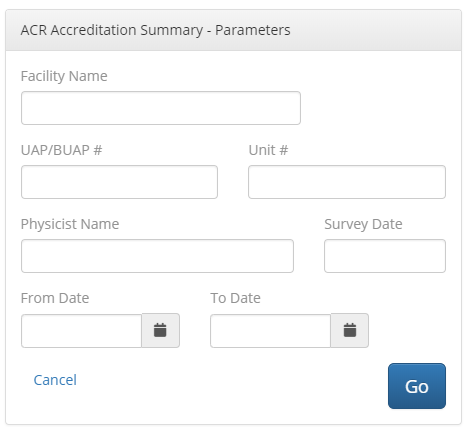
Ultrasound Annual Equipment Survey: Generates a report based on the form listed under the ACR Ultrasound Accreditation Program Requirements page (see section 05, “Gather Data” found at https://www.acraccreditation.org/modalities/ultrasound for an example of this form).
To generate this report, the QA Portal first generates a menu box where users can file out required header information, as shown below:
 Once completed, a report is generated for each piece of equipment tested. Note that, unlike the ACR form, separate reports are generated for ultrasound scanners and transducers. This is necessitated by the way the QA Portal is structured and exceeds the requirements of the ACR form.
Step 5: Managing Your Testing Program Back to Top
Once you have set up your testing program, you will return to the QA Portal Equipment page each time you log onto the portal. The Equipment page lists equipment in the order of which has the soonest test upcoming. To start entering data for one of these tests, click on the test protocol name.
You may also review data from completed tests by selecting the Completed Tests icon .
The designated baseline lineup is always listed prior to upcoming tests. Baseline test data provides the benchmark against which all future tests are conducted, and this test should be repeated any time a machine or transducer is repaired, or any time a new phantom is purchased or repaired, as these changes may affect the outcome of future QA measurements.
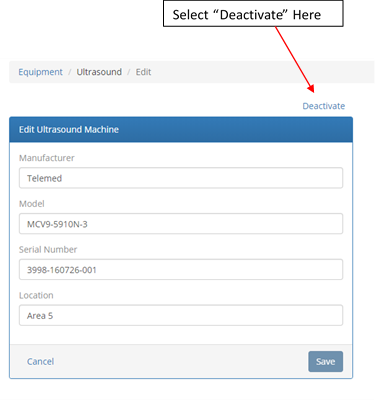
To repeat Acceptance Testing, you will first need to deactivate the ultrasound machine or transducer that was sent out for repair. This is done by first clicking on the machine / transducer name in the equipment list to enter the edit screen shown below. From this screen, select “Deactivate” located at the top right of the edit form: